By Kelly Gunzenhauser
I ran across this idea on Pinterest and pinned it to do with my preschool class for Mother’s Day. This would be a fun activity for a rainy day this summer.
Here is the Pin: http://pinterest.com/pin/180918110003190471/
And here is the original link from Picklebums.com:http://picklebums.com/2013/01/30/melted-bottle-jewelery/.
Below are the materials and the steps.
You Need:
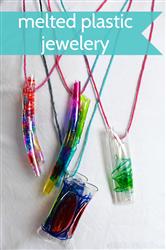
• Plastic soda bottles (I used both 16-oz. and 2-liter. Thin plastic from the middle of the bottle works best.)
• Permanent markers (I used Sharpies. Bright colors work best. Black looks good as an accent but not as a main color.)
• Scissors and hole punch
• Colorful string
• Oven, baking sheet, and foil or parchment
Preheat your oven to 350°.
Remove the soda bottle label, then rinse and dry your bottle.
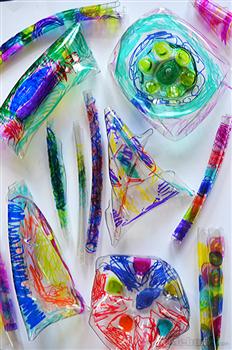
Use scissors to cut out plastic shapes from the middle of the bottle. If you are working with little ones, be sure there are no sharp edges.
Color the plastic with Sharpies. (Only use permanent markers, like Sharpies, or the ink will rub off. Be careful not to get ink on clothing, since it won’t come out easily.) You can color solid blocks or in dots, lines, scribbles, etc.—both look good!
Punch several holes in the plastic, since holes can get covered as the plastic curls up.
Next, line a baking sheet with foil or parchment. Place the plastic pieces on the foil. Arrange them so they are not touching. Bake for 30–40 seconds. (Any longer will burn them.)
When they are finished, they should be shrunken, and some pieces will curl or roll up. Let them cool for a minute. Remove them from the foil.
Pull string though a hole in your favorite piece and tie the ends to make a necklace. (Use a colorful, thin string to match the bright colors on the necklace. Thick string will not fit through the tight spaces left when the plastic shrinks.)
So, what makes this a fun activity? This kind of art lends itself to scribbling, and it’s fast, so it’s perfect for little ones. (But I enjoyed doing it too!) If your oven light works (unlike mine), you can let the kiddies watch them shrink. That is science at its finest. Also, when the plastic comes out, the colors are very clear. A really good shrunken piece looks like art glass. And can you think of a cheaper craft? Enjoy this one and happy crafting!
**Remember, anything you try is at your own risk!!
* A HUGE thank you to Picklebums.com for this fabulous idea and for permission to use the photos above!