By Guest Blogger Jessica Scott, author of the blog Two Wild Daisies
I’m a stay-at-home mom who also happens to have a healthy craft addiction. When I need some me time I love to sit at the sewing machine and create something wonderful out of a little bit of fabric. It’s also so fun to make items to decorate my home either for holidays or just to make my house more homey and customized for my family and their needs. I have put together some simple no-sew and easy-to-sew Halloween and Fall projects to make for your home!
I’d love to hear what you think of these crafts after you try them. Please leave a comment below!
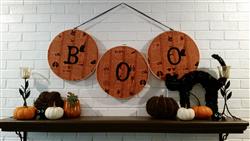 No-Sew BOO Hoop Wall Hanging
Supplies needed
About a yard and a half of fabric, three 14 inch round wooden cross stitch hoops, black adhesive backed felt sheet, ribbon for hanging, and glue if needed.
Steps You will want to iron your fabric so it is completely flat and crisp, then lay the fabric on top of one of the inner hoops (if you wanted the fabric to stay in place permanently you could add glue to the outside of the inner hoop).  Get your fabric lined up how you want it and then press the outer hoop down on top and tighten the screw at the top. Once you have everything tight and taught then trim all the excess fabric off around the hoop. I then used my Cricut paper cutting machine to cut out the letters BOO out of a piece of adhesive felt but you could simply free hand the letters and cut with scissors. I stuck one letter on each hoop in the center and ironed for a second face down on the back of the fabric to just set the letters. I used office clips to hold the three hoops together, this way if I want to use the hoops for something else down the road or store them till next year I just unclip them. Add a piece of sparkly ribbon to hang on the wall and you are done, this is great over a mantle or as a focal point on a wall.
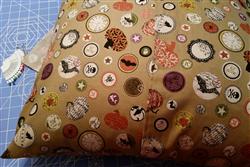 Easy-to-Sew Pillow Covers
Supplies needed
Since I already had two twenty inch pillow forms on hand, I just bought two yards of Pumpkin/Halloween print fabric and a spool of thread.
Steps
 I cut my print fabric in half making two 36 inch or one yard wide pieces. Each cut piece had two factory edges on the ends that I simply folded over and sewed with a straight stitch to give me two finished edges. I then folded the fabric over on itself with the print side inside and overlapped my finished edges to make a 20 ½ inch pocket for the pillow. Make two straight stitches on each end, turn inside out and you end up with a pillow cover. Just wiggle your pillow in through the opening and then close your opening by smoothing the overlapping pieces down. This is an easy way to change up your couch throw pillows for each season!
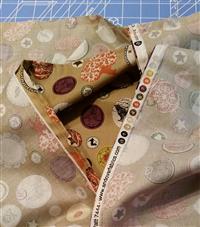
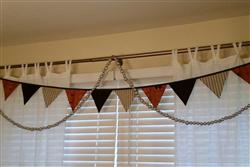 Fabric Triangle Banner
Supplies needed
At least three 1/4 yard pieces of printed fabric, one half yard of solid fabric for backing and a package of double fold bias tape that coordinates with your fabric.
Steps To make this I simply cut four 8 inch triangles out of three different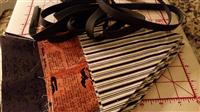 Halloween fabrics and then twelve off-white 8 inch triangles for backing. I sewed the triangles together on two sides with the right sides of the fabric facing each other and then turned them right side out and ironed all the triangles so that they were flat and crisp. Then I tucked each triangle into a piece of double fold bias tape, pinned them in place, and then made one straight stitch down the entire length of bias tape to finish the banner. Fabric pennant banners are great to hang over a window, fireplace mantle, or wall!
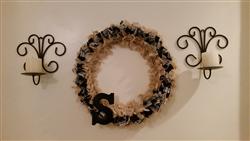 No-Sew Burlap/Fabric Wreath
Supplies needed
A metal wreath form with four support rings, a yard or so of burlap fabric, and a ¼ yard of Halloween fabric, and if you want to add a monogram like I did then a large wooden letter.
Steps  I used a rotary cutter and cutting mat with one inch grids and cut all of the burlap and fabric into one inch by six inch pieces. Then you simply start with the outer ring and tie on the strips into a simple knot. I then added another row of burlap, a row of the fabric, and finished with a row of burlap. To add the S wooden letter I stapled a strip of fabric to the back of the letter and tied it on to the ring with the fabric ties so the fabric blended in. You could hang this on a door or wall, just be aware that the burlap does create a “dust” when the fibers rub each other so you don’t really want it to move around a lot.
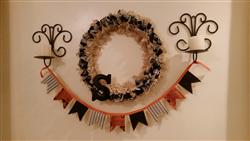 Small Fabric and Burlap Pennant Banner
Supplies Needed
I used all of the leftover fabric from my other projects and half of a package of double fold bias tape to make a small banner.
Steps
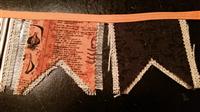 I cut out nine small 4 inch square pieces of fabric and then 9 larger rectangles about an inch bigger out of burlap. On each fabric piece I used pinking shears to give an interesting edge and cut out an inverted triangle, for the burlap I just used regular scissors to cut out an inverted triangle and a needle to gently fray the edges. I pinned one piece of fabric to each piece of burlap and then pinned each banner section into the bias tape and then one straight stitch down the length of the bias tape to connect everything together. I hung mine between two wall mounted candle holders but you could hang from your fireplace mantle, large mirror, or on a hutch.
I hope you have as much fun making one or all of the Halloween projects listed above as I did creating them for you!