

Simple Halloween Crafts for Kids

Halloween is the perfect time to get crafty with kids! With cooler weather and shorter days, families can enjoy quality time indoors while creating spooky, cute, and imaginative Halloween crafts for toddlers and older kids alike. Making Halloween arts and crafts not only brings out your little one’s creativity but also builds fine motor skills, coordination, and a sense of accomplishment. From ghostly projects to pumpkin fun, there’s no shortage of ways to entertain your kids with these adorable Halloween crafts.
Halloween Craft Supplies
To make the crafting process even easier, consider setting up a small Halloween craft station at home. Stock it with essentials like construction paper, markers, glue sticks, scissors, googly eyes, and pipe cleaners. Having a dedicated space lets kids explore their creativity freely, and you can keep all their Halloween crafts in one organized spot.
Ghost Crafts
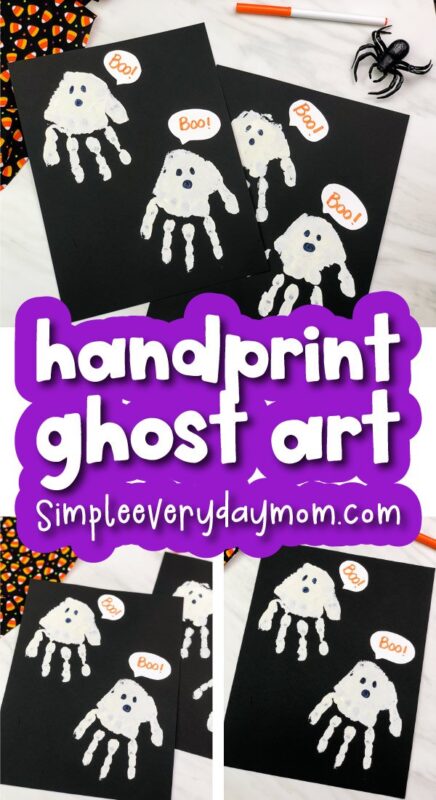
Ghost crafts are a Halloween classic, perfect for all ages, and easy to make with simple materials. Start with ghost handprints (we found this idea from Simple Everyday Mom), where little hands can transform into spooky spirits using white paint on black paper. Once dry, add two black circles for eyes, and your little ghost is ready!
Another fun option we found from mombrite.com is making cotton ball ghosts. Have kids glue cotton balls onto construction paper in a ghostly shape, then use black markers or felt to create eyes and a mouth. These ghosts are soft, fluffy, and oh-so-cute, a great addition to any Halloween decor.
Another idea is puffy ghost painting. Mix equal parts of shaving cream and white glue, and let kids paint their ghosts on dark paper. As it dries, the paint will puff up, adding a fun 3D effect that kids will love. Ghost crafts like these are a great way to capture the spirit of Halloween while encouraging creativity.
Paper Roll Bat
Start by painting or coloring a toilet paper roll. Have the kids cut out two triangles for teeth. Cut out the wings in any interesting way. We cut out one long piece for the wings but they could also be two pieces. You could use construction paper for the eyes but we think googly eyes are so much more fun! Now glue all the parts on to the paper roll. If you want to hang these adorable bats, use a hole punch to create a hole in the top backside of the roll. Then thread a pipe cleaner through the hole. Fold the pipe cleaner in half, twist pieces together and create a hook at the ends.
Paper Plate Halloween Crafts
Paper plates are one of the most versatile materials for Halloween crafts. With a bit of imagination, they can become almost anything. Create a classic paper plate pumpkin by painting it orange, adding black triangle eyes, and a spooky or silly mouth. Toddlers especially love this craft because it’s easy and mess-free if you use markers instead of paint.
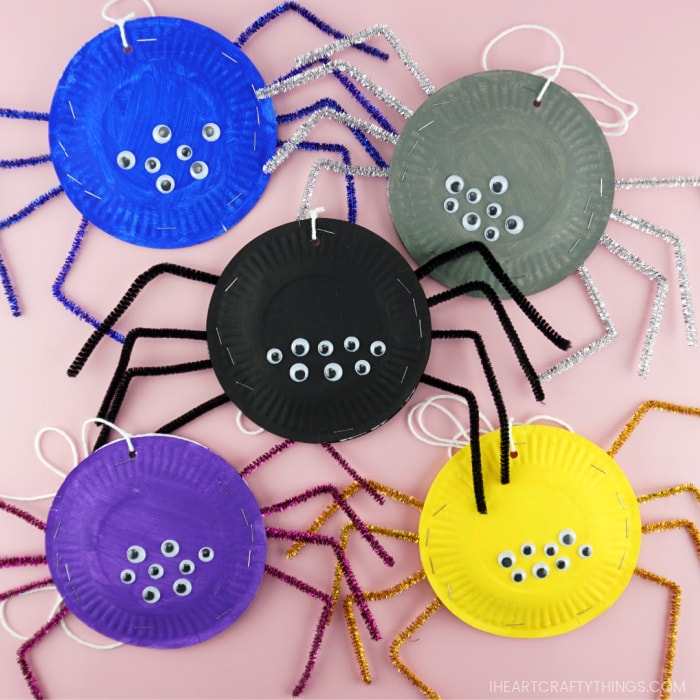
For a little added fun, make spider paper plate crafts. Paint the plate black, attach googly eyes, and add pipe cleaners for legs. Kids will enjoy transforming these plates into creepy (but cute) spiders. Or, turn a paper plate into a bat by cutting two sections off to form wings, then attaching them to either side with glue or tape. Kids can decorate their bats with glitter, markers, or stickers, letting their imaginations take flight.
Pumpkin Halloween Crafts
3D Paper Pumpkin Craft
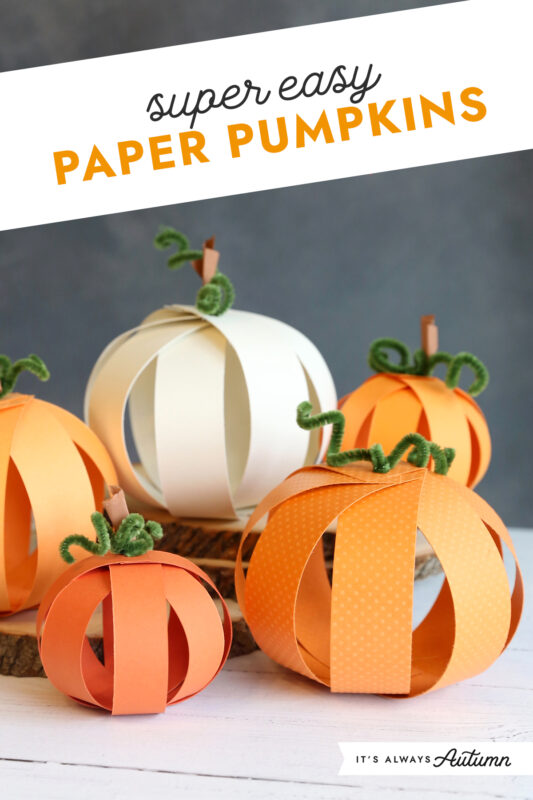
Pumpkins are the hallmark of Halloween, and there are endless ways to make pumpkin crafts. Start with paper pumpkins (we found this idea from It’s Always Autumn), where kids can cut orange construction paper into strips, stack them in a criss-cross pattern, and secure the ends to create a 3D pumpkin. Add a green paper stem on top, and you’ve got an adorable craft that even toddlers can manage.
Another fun project is pumpkin stamping. Cut apples in half and dip them in paint to make adorable stamped pumpkins on paper. It’s a fun, sensory experience for young children, and they get a kick out of seeing real food become part of their artwork. For a no-mess option, try decorating foam or paper pumpkins with stickers, markers, and googly eyes for a customizable Halloween craft.
Shapes & Pumpkins
I love a craft that allows for imagination and indirectly teaches in a creative way. Start by giving your child a circular shape piece of paper. This is the pumpkin face they will decorate. Let them paint or color it. Then have them cut out different shapes. Think: circle, semicircle, triangles, squares and rectangles. Now they can decorate their jack-o-lantern by gluing these shapes down. I casual will emphasis how I love the way they used a particular shape and pretend to forget that shape’s name. They love to correct me or help me remember the shape.
Paper Bag Pumpkin Craft
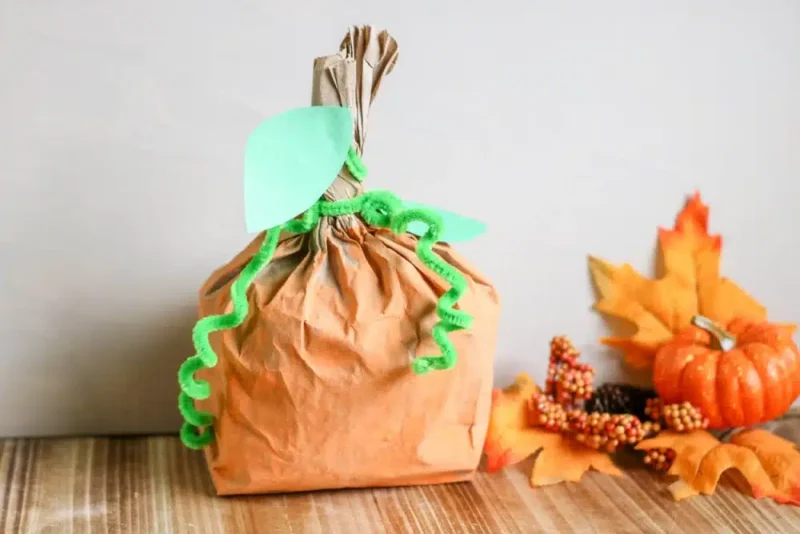
This simple craft is full of versatility! You can either have the kiddos color a paper bag (both sides) with crayons or markers before the assembling process or they can paint it after putting it together. To form the pumpkin shape, let the kids stuff the paper bag with balled up pages of a magazine or newspaper. Once the bag is stuffed to form a round shape, take a rubber band to close the top. This will create the pumpkin stem. If you are painting the pumpkin, then this is the time to do that. Once the paint has dried they can start decorating their pumpkin. Again, this can be done multiple ways. They can draw faces, cut out shapes and glue them on, use googly eyes or stickers.
Halloween Spider Crafts
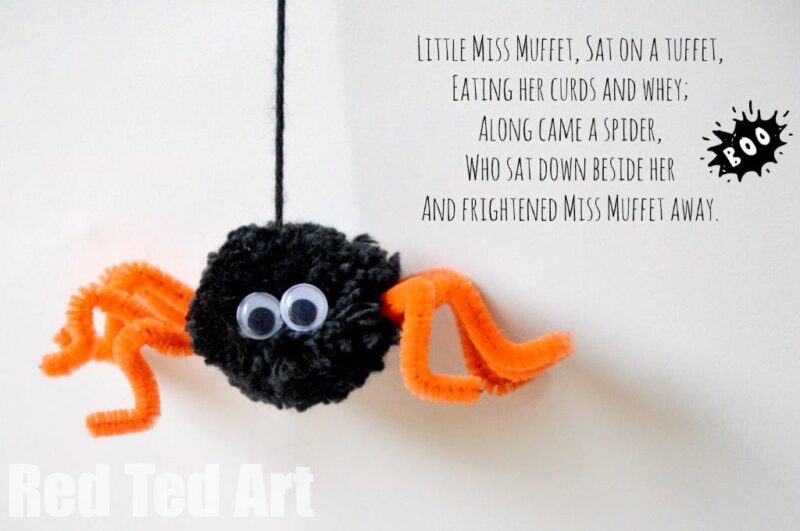
Spiders may be spooky, but in craft form, they’re just plain cute. These Pom-pom spiders we found from Red Ted Art are easy to make with a little help. Kids can glue a black pom-pom onto a paper or craft stick, then add pipe cleaners as legs and googly eyes. Place them around the house as a surprise for family members, or hang them on string to make spider garlands.
Another idea is creating spider hats from construction paper. Roll black paper into a hat band that fits around your child’s head, then attach eight long paper strips to make dangling legs. Stick on some googly eyes, and you have an adorable spider hat that’s perfect for Halloween festivities. This craft not only sparks creativity but makes a memorable accessory for Halloween playtime.

Magic Water Painting Book
If you’re looking for a mess-free activity, a Magic Water Painting Book with Halloween themes is an ideal choice. Kids simply dip a brush in water and paint on the pages to reveal hidden colors and images. This craft is especially suitable for toddlers, as it requires no paint or glue. The spooky designs of pumpkins, ghosts, and witches appear as if by magic, delighting young artists without any cleanup needed.
Magic Water Painting Books are great for encouraging fine motor skills and artistic expression in young children. Plus, this one the pages can be reused once they dry, making it a fantastic option for multiple Halloween craft sessions.
Halloween Dry Erase Activities

Halloween-themed dry-erase activities are a fantastic way to keep kids entertained with minimal mess. Kids can practice drawing pumpkins, ghosts, and other spooky shapes, then erase and start again. This reusability not only saves paper but also allows kids to experiment freely, boosting their creativity without the need for constant new supplies.
Consider dry-erase activity books with pre-drawn Halloween scenes. Kids can add their own touches, like funny faces on jack-o’-lanterns or decorations for haunted houses, then wipe it all away to try a new design. For learning-focused fun, Halloween dry-erase activity sheets featuring puzzles, connect-the-dots, or tracing exercises can reinforce early skills while sticking to the holiday theme. These activities are especially great for car rides or quiet time at home, offering a hands-on way for kids to celebrate Halloween. Plus, they’re easily reusable for years to come.
Cardboard Haunted House Coloring Kit
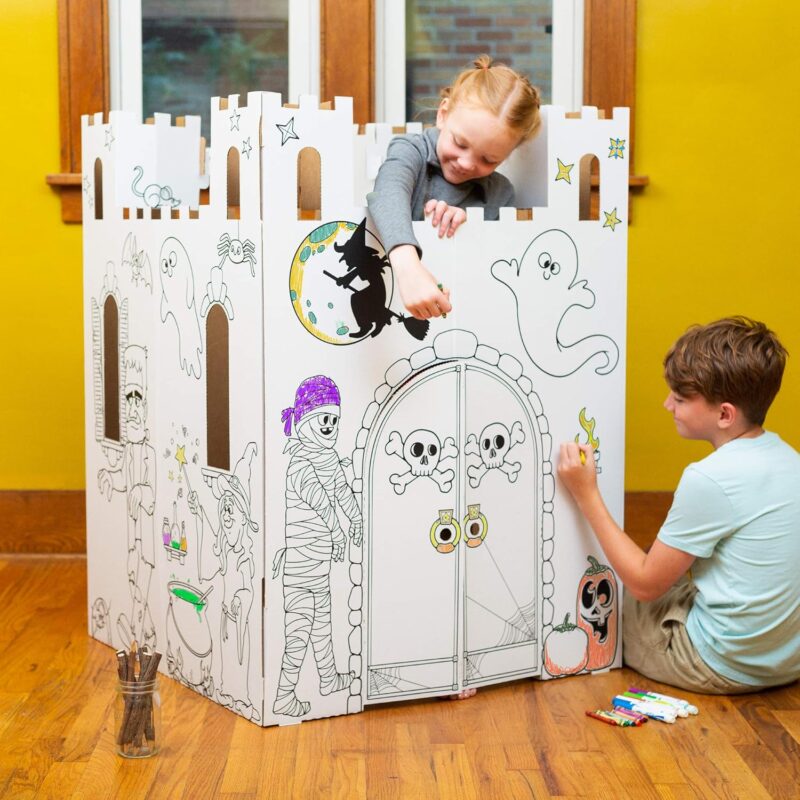
A Cardboard Haunted House Coloring Kit offers endless entertainment for kids who love to color, assemble, and play. These kits include sturdy cardboard pieces that children can color and then piece together into a mini haunted house. With spooky designs like bats, skeletons, and spider webs, kids can bring their haunted house to life with their own color choices.
After coloring, assembling the haunted house provides a hands-on learning opportunity, building fine motor skills and spatial awareness. Set it up as a Halloween decoration, or let kids play with small figures inside their new haunted creation. It’s a wonderful keepsake that can even become a yearly Halloween tradition!
Like any craft project I make with kiddos, I keep in mind that it is supposed to be fun for them. Keep the mantra “process over product”. Sometimes they take a creative turn with their craft that doesn’t look like the picture in your mind. That is okay! Don’t feel the need to jump in and “fix” their creation. Everyone has a different interpretation of art. It’s such a joy to see their faces light up as they proudly show their creation to others.
Links to More Halloween Craft Ideas
If you’re looking for more inspiration, check out these easy Halloween crafts from previous posts. Try DIY Halloween Decorations for simple, budget-friendly ways to decorate your home. Both guides offer plenty of fun ways to get into the Halloween spirit with your family.
I hope you and the kiddos enjoy making these simple Halloween crafts. Have a fun, safe and Happy Halloween!
By TMoM Team Member Sandy Harper & Sarah Marchwiany
Want to see more blogs like this and also get notifications on local events and happenings? Subscribe to our free weekly newsletters here.