Fall Craft: Toilet Paper Pumpkins
By Emily Halsey
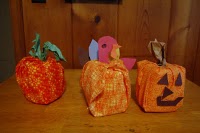
Happy Fall! Here is a great craft for adults and kids. It’s cheap, easy, and fun – my main requirements! You also get more bang for your buck with this, because it can be used for Halloween and Thanksgiving. Hope you and your little ones have fun creating this very versatile pumpkin!
The materials you will need are as follows:
1. 18” x 21” material square in fun fall colors and patterns (Wal-Mart and Joann’s have the great pre-cut squares of fabric in all sorts of prints. Wal-Mart’s are $1.00 and Joann’s are $1.49 regularly price, although they have been on sale for $1.00). Or you can always buy larger dimensions to save a little money and then cut the material yourself.
2. Black, green, and brown construction paper. (An old paper bag is a great substitute and a wonderful way to recycle!)
3. Scissors
4. Tape
5. Roll of toilet paper (Do not use the jumbo or double rolls. The material is big enough for a regular roll.)
Begin by placing your toilet paper roll in the center of your material. Help your child gather the ends of material and tuck them into the hole in the top of the toilet paper roll. You can fold and tuck edges to make sure none of the toilet paper shows through.
Next, cut a strip of brown or green paper and let your kiddo twist and crumple it to their heart’s desire! This will be your pumpkin stem, so it can be as long or short as you would like it. You will stick this into the hole of your toilet paper roll. If you are really into twisting and crumpling paper (my daughter always was) you can do some longer strips and tuck them into the hole to create a vine. If you have now had all the excitement you can stand, you can have a finished product, a beautiful fall pumpkin decoration.

However, if, like at our house, you live for all things Halloween, then keep going! Cut out your favorite shapes from the construction paper to use as eyes, nose, and mouth. With your tape, place them onto your pumpkin to create the perfect jack-o-lantern. I use tape, because when Halloween is over it is easy to simply remove the face and have a decoration for fall.
It is also fun to turn this into a Thanksgiving turkey. Simply remove the face and stem and you have a blank canvas again. Use construction paper to create feathers and a turkey neck and head. We generally make a candy cane shape out of red paper for the neck and head and stick it in the hole where the pumpkin stem goes. We then use orange or yellow paper to create a triangle beak and a teardrop gozzle. You can let your child draw eyes, cut them out of paper, or attach googly eyes. A glue stick works nicely to put the finishing touches on the turkey head, but I do tape my feathers to the back so I can reuse the fabric.
My kids are 6 and 2, a boy and a girl, and they and their friends love this. For the little ones it is great because they can do almost everything themselves (with some assistance, of course) but the older kids don’t think it is only something for “babies” (My 6 year old’s words!) When you’re done, you can throw the material into your craft box, recycle the paper, and use the toilet paper. Fun, easy, and environmentally friendly!


