Springtime Crafts for Kids of All Ages
Spring break is great time to work on crafts with kids while they are at home. Best of all these are easy to do even with younger kids.
Springtime Craft 1 – Paper Plate Flower
Materials Needed:
Red, orange, and yellow paint
White, green, and red paper
Paper plate
Paintbrush
Scissors
Stapler
Glue
Step 1: Paint a white sheet of paper with all the colored paints and let dry.
Step 2: After that paint a paper plate with yellow/orange paints and let dry. Cut the first piece of paper into strips and make “loops” stapling them to the back of the paper plate. Cut up some extra red paper strips to add to the gaps.
Step 3: Cut out a green stem and leaves, gluing them to the back of the paper plate.
See complete step by step with photos here.
Springtime Craft 2 – Ladybug
Materials Needed:
Paper Plate cut in half (for body)
Small circle (for face)
Red and black paint
Googly Eyes
Black yarn
Black pony beads
Glue and tape
Regular paint brush and a circle sponge brush
Step 1: Paint the body of the lady bug red and the circle face black.
Step 2: Once the paint dries, stamp black circle polka dots on the body.
Step 3: Cut black yarn for legs. Legs can vary in size so you don’t even need to measure. Then tape the yarn legs to the back side of the paper plate ladybug. Next tie the pony bead to the ends of the string for feet
Step 4: For the face, glue on the eyes and add two smaller yarns with pony beads for antennas.
See complete step by step with photos at: http://www.housingaforest.com/paper-plate-ladybug/
Springtime Craft 3 – Rainbow
Materials Needed:
Fruit Loops or a similar cereal
Paper
Glue
Markers or crayons
Cotton balls
Step 1: Begin by having kids draw the outline of a rainbow on their paper or for younger children draw it for them.
Step 2: Have the kids cover the rainbow lines in glue, then start gluing on matching color fruit loops on each line.
Step 3: Once the rainbow is complete glue a cloud to the end using cotton balls.
See complete step by step with photos at: http://www.growingajeweledrose.com/2014/03/rainbow-craft-for-kids.html
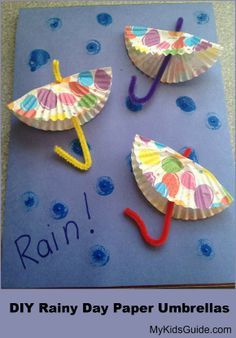
Springtime Craft 4 – Umbrella
Materials Needed:
Construction paper of any color
Blue construction paper
Scissors
Cupcake liners
Glue and Tape
Pipe cleaners in any color
Bingo Blotters (Bingo Blotters are the bottles of ink that bingo players blot their numbers with. These are perfect for creating “raindrops”. Example of where these can be found here.
 Step 1: Start by having your child paint or decorate the cupcake liners with markers. You can also use ones as seen here that are already decorated.
Step 2: Add some glue dots to the paper.
Step 3: Add your rain drops by using your paper to cut scraps or use your blotter.
Step 4: Fold the cupcake liners in half or cut.
Step 5: Bend and added the pipe cleaners to the cup with tape.
Step 6: Add more glue for your umbrellas. Add the umbrellas and let dry.
See complete step by step here: http://www.mykidsguide.com/craft-for-kids-diy-paper-umbrellas/
Enjoy these springtime crafts with your kids this spring! Also check out this blog for Easter crafts which also work well for spring!
By Suzy Fielders

